Photo by engin akyurt on Unsplash
Adding CloudFront As A CDN To API Gateway
Learn how to access API Gateway through CloudFront to speed up your load times
Last time...
We looked at how we can use a combination of AWS Lambda, API Gateway, and S3 to dynamically resize your images on the fly. At the end, I mentioned adding AWS CloudFront in front of your API Gateway service, so that's what we're going to be doing right now.
Why?
CDN's cache static content and deliver it to servers around the world, so that when your user requests your content, they are getting it from the closest server possible, increasing the speed at which your content loads.
We are going to use AWS CloudFront as our CDN to increase the speed at which our images load as we will no longer have to wait for the Lambda function on every request. In addition, we will not suffer from Lambda cold start times anymore! In addition, you're going to save on requests made to your API Gateway, although to compensate you do have to pay for CloudFront storage.
How

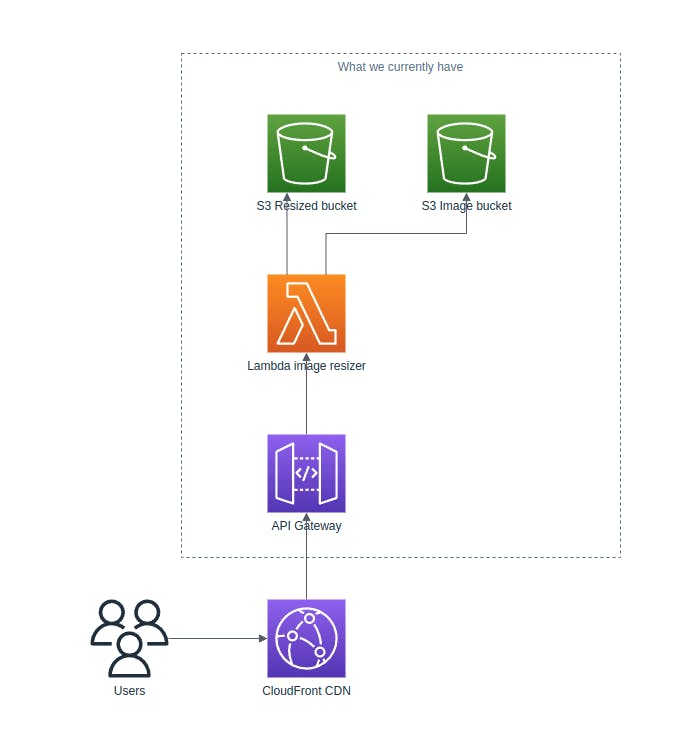
As you can see we're going to take what we created in the previous blog, and then put a CloudFront instance in front of API Gateway, so that our users will access the CDN instead of API Gateway directly. We will look at how to enforce this in future blogs.
Requirements
Implementation
Setting up the CloudFront distribution
To start off with, head to the CloudFront console on your AWS console and press Create distribution.
In Origin domain, enter your API Gateway URL without the stage name and the protocol, that is if your API Gateway URL is https://abcdef.execute-api.ap-southeast-2.amazonaws.com/stageName/, you should put abcdef.execute-api.ap-southeast-2.amazonaws.com.
Set your Protocol as HTTPS only, set the Minimum origin SSL protocol to TLSv1.2, and then set the Origin path as /stageName where stageName is your API Gateway stage name. This will make it so that you will not have to specify the stage name when you make a request to your CDN. If this is not your intended behaviour, leave this field blank.

Now scroll to the bottom and press Create distribution and wait for your distribution to be deployed. Note that this could take a while.
Setting up the CloudFront policies
Now that your CloudFront distribution has been deployed, it is not ready for use just yet. If you make a request to your CDN with the form CDN_URL/IMAGE_NAME, you might notice that it works, however, it will not work correctly when you specify CDN_URL/IMAGE_NAME?size=WIDTHxHEIGHT. We're about to fix that.
On the CloudFront side nav bar, select Policies and then Cache.

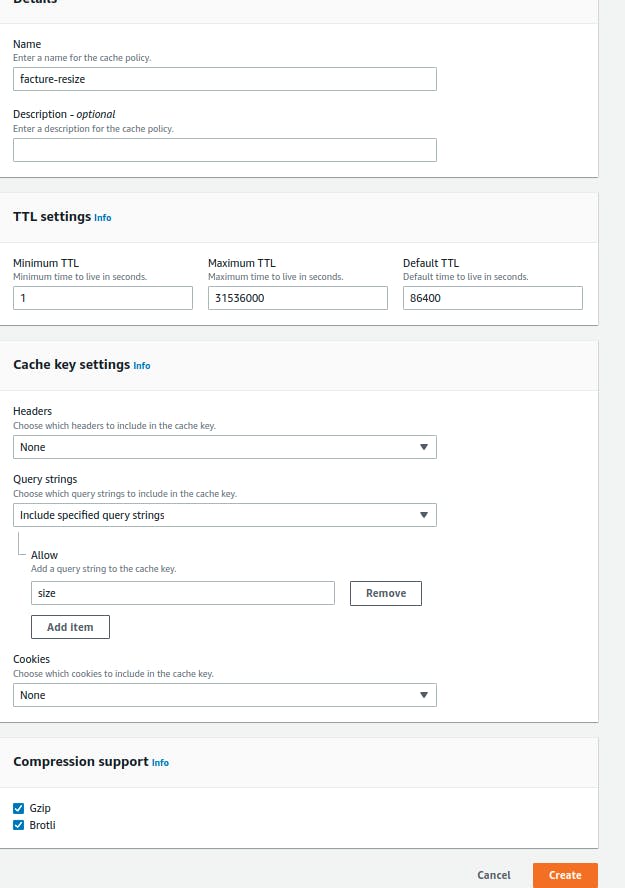
Now under Cache, select Create cache policy, give it a name, and under Query strings, set the option to Include specified query strings, then allow the query string size. Press Create to finalize the new cache policy.

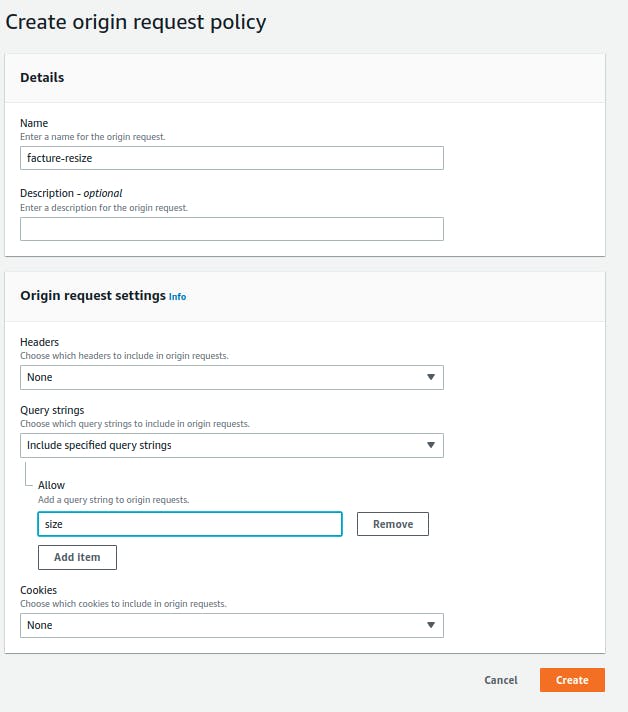
Now go back to the Policies tab on the side nav bar and select Origin request.

Follow the same steps above for the Create cache policy.

Attaching the policies to your CloudFront distribution
Now head back to your distribution dashboard and navigate to Behaviours.

Select your behaviour and press Edit.

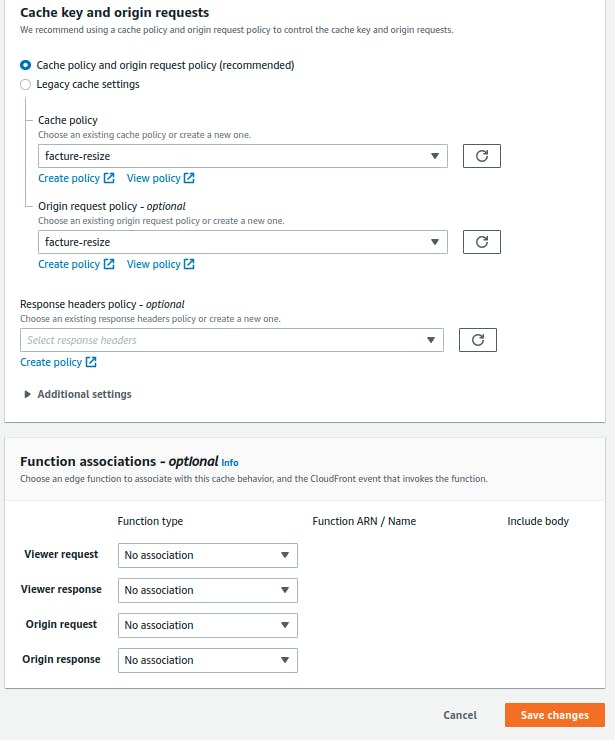
Now under Cache key and origin requests, under Cache policy, set your cache policy to the cache policy you created above. Similarly for the Origin request policy, choose the origin request policy you created above. Once you are finished, press Save changes.

Using your CDN
On the General tab for your distribution, you should see a Distribution domain name. Copy that URL into a browser, then add a slash followed by the name of your image from your cold bucket created in the previous blog, followed by the size as a query parameter, with the following form CLOUDFRONT_URL/IMAGE_NAME?size=WIDTHxHEIGHT. If you set everything up correctly, your image should download with the requested size.
Next steps
So now you have a working CDN to serve your dynamically resized images at lightning speed to your users from your website. But what's next? Earlier I mentioned restricting the access to your API Gateway to only be accessible from CloudFront, and that's what we will take a look at next time. Until then, enjoy!
