

Photo by Deon Black on Unsplash
Dynamically Resizing Images With AWS Lambda
Learn how to harness the power of AWS to automatically resize and cache your images on the fly!


Table of contents
Introduction
Recently I was in the process of setting up my newest side project, where I had my first encounter with handling images to be displayed on the client-side, which turned out to be no trivial task!
Most of us when we visit a website take images for granted, however, getting every image uploaded to be displayed as a particular size is a lot trickier than one would initially think, and that's why I'm going to be discussing my approach to resizing images dynamically using AWS Lambda!
Different approaches
As with most things in the discipline of software engineering, there are many ways you could approach this problem.
Approach 1 (bad)
The first idea that came to mind was to simply resize every image myself before uploading it. This is by far the simplest method, and to be fair it would work as I handle all of the content that gets uploaded to my website. However, what happens if in the future I allow other people to upload content to my site. How can I make sure they upload the right-sized content? Not to mention manually resizing images is really annoying. Let's think of something else.
Approach 2 (better)
The next idea I thought of was to have a cloud function automatically resize my images when I uploaded them to the bucket and store the resized images with a particular prefix in a new bucket. On initial thought, this idea sounds great since I don't have to take care of manually resizing my images. However, I found that this solution had a few drawbacks. The main drawback that came with this was the lack of flexibility it produced. If I defined my cloud function to resize images to 1000x500 initially, and then I found out I really needed 1000x750, the cloud function would not have been able to update the images to reflect this without extra development effort from me. In addition, if I had multiple dimensions images could take, how would the cloud function know which particular dimensions to resize it to? Would it just resize it to every dimension? This isn't particularly storage effective, for example, if I had 10 different image sizes and each image only needed 1 type of dimension but I created copies for all 10 dimensions, this would increase my cost 10x. There has to be a better way...
Approach 3 (GOOD)
Finally, now we will consider dynamic image resizing. I will upload my images to a separate storage container in the cloud, and then I will make a request to my server which will return the resized image if it exists, or it will dynamically resize it at runtime, store it for later use, and then return it to me all within the same request. This makes sure that my images are only ever resized for the dimensions they require saving me storage fees and allowing me to easily request a different set of dimensions in the future if the frontend requirements change. This is the solution we will be implementing in this article!
High level overview
Here's a diagram providing a high-level overview of what we are going to be building.
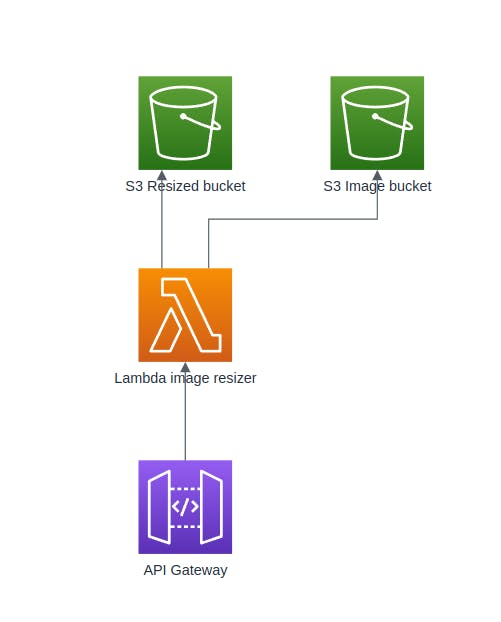
We will have an AWS API Gateway service which will act as the entry point for image requests. This gateway will forward the image request to a lambda function along with the URL params containing the requested image and size, which will then check the S3 resized bucket for the image. If it finds the resized image exists in this bucket, it will simply return it. However, if the image doesn't exist, we will get the image from the S3 Image bucket, resize it, store it in the resized bucket, and then return it.
Requirements
To follow along you will need
- An AWS account
- The AWS CLI
- The AWS SAM CLI
- NPM
- Docker
- Basic understanding of AWS services (and AWS fee structure)
Implementation
Creating the S3 buckets
First of all, you will need to create two S3 buckets. One of these buckets will be used for storing your original copies of the images that you wish to have uploaded, and the other will store your resized images. You may call your buckets whatever you wish, but make sure you remember which bucket is responsible for what.
Next, make sure that both of your buckets block all public access. This is a best practice recommended by AWS and will ensure that your images can only be accessed from API Gateway which we will set up later on.
You should now see something like this in your S3 console.

Creating the Lambda function
This is gonna be the trickiest step so far. We're going to be writing our Lambda function using TypeScript and we're going to be using the Sharp library for resizing our images. When I was setting this up for myself the first time I encountered a few issues with Lambda not working well Sharp when the function was uploaded directly, so therefore we will be uploading our Lambda function as a container using Docker.
Creating the function locally
Run npm init -y in a new directory to create a new npm package for our Lambda function. Now inside that directory run the following commands to install the dependencies for the project npm install -D @types/aws-lambda @types/node @types/sharp typescript && npm install aws-sdk sharp .
To setup TypeScript, create a new file called tsconfig.json and add the following code:
{
    "compilerOptions": {
        "target": "es2020",
        "module": "commonjs",
        "outDir": "./dist",
        "esModuleInterop": true,
        "forceConsistentCasingInFileNames": true,
        "strict": true,
        "skipLibCheck": true
    }
}
This just specifies that we want our compiled TypeScript code to be output to the dist directory.
Now create a new file called template.yaml and add the following code:
AWSTemplateFormatVersion: "2010-09-09"
Transform: AWS::Serverless-2016-10-31

Resources:
    FactureResizeFunction:
        Type: AWS::Serverless::Function
        Properties:
            PackageType: Image
            Architectures:
                - x86_64
        Metadata:
            DockerTag: nodejs16.x-v1
            DockerContext: .
            Dockerfile: Dockerfile
This is going to define how SAM will build our Lambda function for us from the Dockerfile we provide.
Now we're going to create our function. Create a new directory called src, then navigate into the newly-created directory. Here we're going to add the code which will define our Lambda function.
First, create a new file handleNoSize.ts and add the following code:
import { APIGatewayProxyResult } from "aws-lambda";
import S3 from "aws-sdk/clients/s3";

import { getExtension } from "./misc";

export default async (fileName: string, coldBucket: string, s3: S3): Promise<APIGatewayProxyResult> => {
    const fileExtension = getExtension(fileName);

    const uploaded = await s3.getObject({ Bucket: coldBucket, Key: fileName }).promise();

    return {
        statusCode: 200,
        headers: { "Content-Type": "application/" + fileExtension, "Content-Disposition": `attachment; filename=${fileName}` },
        body: uploaded.Body?.toString("base64") || "",
        isBase64Encoded: true,
    };
};
This function handles requests that do not specify a size and just wish to receive the raw image. It simply pulls the raw image from the original bucket, then returns it.
Next, create a file called handleResize.ts and add the following code:
import { APIGatewayProxyResult } from "aws-lambda";
import S3 from "aws-sdk/clients/s3";
import sharp from "sharp";

import { getExtension } from "./misc";

export default async (fileName: string, key: string, dimensions: { width: number; height: number }, coldBucket: string, resizedBucket: string, s3: S3): Promise<APIGatewayProxyResult> => {
    const fileExtension = getExtension(fileName);

    const uploaded = await s3.getObject({ Bucket: coldBucket, Key: fileName }).promise();

    const image = await sharp(uploaded.Body as Buffer)
        .resize(dimensions.width, dimensions.height)
        .toBuffer();

    await s3.upload({ Body: image, Bucket: resizedBucket, Key: key }).promise();

    return {
        statusCode: 200,
        headers: { "Content-Type": "application/" + fileExtension, "Content-Disposition": `attachment; filename=${key}` },
        body: image.toString("base64"),
        isBase64Encoded: true,
    };
};
This function pulls an image from the original S3 bucket from its name and resizes it to the specified dimensions, stores it in the resized bucket for further use, then finally returns it.
Similarly, create a file called handleResized.ts and add the following code:
import { APIGatewayProxyResult } from "aws-lambda";
import S3 from "aws-sdk/clients/s3";

import { getExtension } from "./misc";

export default async (key: string, resizedBucket: string, s3: S3): Promise<APIGatewayProxyResult> => {
    const fileExtension = getExtension(key);

    const uploaded = await s3.getObject({ Bucket: resizedBucket, Key: key }).promise();

    return {
        statusCode: 200,
        headers: { "Content-Type": "application/" + fileExtension, "Content-Disposition": `attachment; filename=${key}` },
        body: uploaded.Body?.toString("base64") || "",
        isBase64Encoded: true,
    };
};
This function will find a resized image from the resized S3 bucket and then return it.
Now, create a file called index.ts and add the following code:
import { APIGatewayEvent, APIGatewayProxyResult } from "aws-lambda";
import S3 from "aws-sdk/clients/s3";

import handleNoSize from "./handleNoSize";
import handleResize from "./handleResize";
import handleResized from "./handleResized";

const s3 = new S3({ apiVersion: "2006-03-01" });

const COLD_BUCKET = process.env.COLD_BUCKET as string;
const RESIZED_BUCKET = process.env.RESIZED_BUCKET as string;
const ALLOWED_DIMENSIONS = new Set();

// Allowed dimensions format: "wxh,16x16,28x28"
if (process.env.ALLOWED_DIMENSIONS) {
    const dimensions = process.env.ALLOWED_DIMENSIONS.split(",");
    dimensions.forEach((dimension) => ALLOWED_DIMENSIONS.add(dimension));
}

export const handler = async (event: APIGatewayEvent): Promise<APIGatewayProxyResult> => {
    const fileName = event.pathParameters?.file;
    const size = event.queryStringParameters?.size;

    if (!fileName) throw Error("No file name provided");
    if (!size) return await handleNoSize(fileName, COLD_BUCKET, s3);

    if (ALLOWED_DIMENSIONS.size > 0 && !ALLOWED_DIMENSIONS.has(size)) return { statusCode: 403, headers: {}, body: "" };

    const resizedKey = size + "." + fileName;

    try {
        return await handleResized(resizedKey, RESIZED_BUCKET, s3);
    } catch {
        const split = size.split("x");

        return await handleResize(fileName, resizedKey, { width: parseInt(split[0]), height: parseInt(split[1]) }, COLD_BUCKET, RESIZED_BUCKET, s3);
    }
};
This will be the entry point of our Lambda function and will route the request to the functions we specified above.
Finally, create a file misc.ts and add the following code:
export const getExtension = (fileName: string) => {
    const split = fileName.split(".");
    return split[split.length - 1];
};
These are just some helper functions for the other files.
You'll be happy to know that that's all of the code required for the implementation of our Lambda function. Now we just need to deploy it.
To do this we must first Dockerize our application. To do this, navigate back to the root of your package directory and create a new file called Dockerfile then add the following code:
FROM public.ecr.aws/lambda/nodejs:16 AS builder

WORKDIR /usr/local

COPY . .

RUN npm ci

RUN npm run build

FROM public.ecr.aws/lambda/nodejs:16 AS production

COPY --from=builder /usr/local/dist /usr/local/package*.json ./

RUN npm ci --production

CMD ["dist/index.handler"]
This Dockerfile is going to install our project dependencies, build our code, and then expose the handler so that it can be invoked by the Lambda runtime once it is deployed.
Deploying and setting up the function on AWS
Now all that is left to do is deploy our Lambda function! To do this we will be using the SAM CLI.
First run sam build, which will go through and build our Docker container from our Dockerfile.
After making sure that you're logged in to the AWS CLI on your machine, run sam deploy --guided and follow the onscreen walkthrough. Now if you navigate to the AWS Lambda console, you should see your deployed function!

Now navigate to the dashboard of your newly created Lambda function as we have to add a few more things for the function to work.
First, navigate to the Configuration tab and then navigate to the Permissions tab. Click on the role name which will allow you to configure the permissions for your Lambda function.
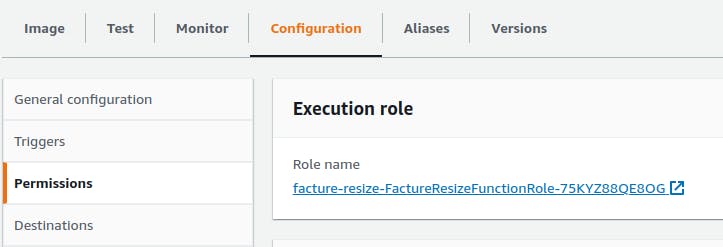
Now click Add permissions, Attach policies, and give your role the AmazonS3FullAccess policy, which will allow your Lambda function to interact with your S3 buckets easily.
Now navigate back to your Lambda function dashboard and go to Environment variables and create the following variables:
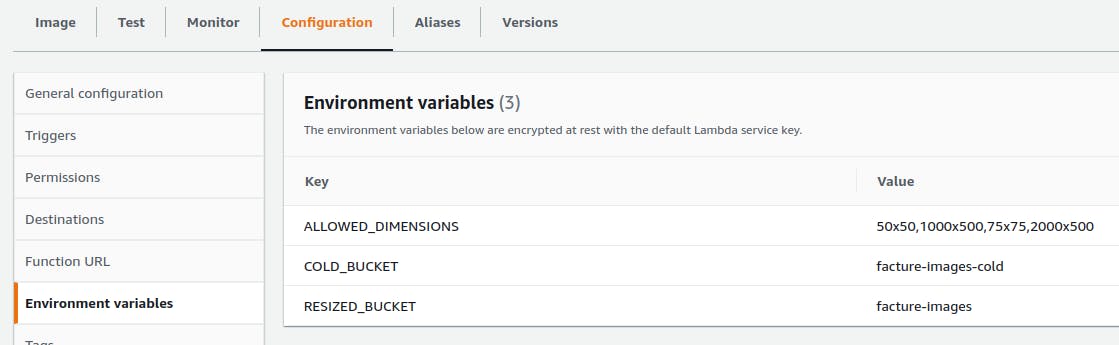
Replace the value for COLD_BUCKET and RESIZED_BUCKET with the respective names you gave to your S3 buckets created earlier. ALLOWED_DIMENSIONS contains a comma separate list of dimensions that the function can resize images to. If you want your function to resize to any dimension, set this value as an empty string.
Setting up API Gateway
Now the last thing for us to do is to setup API Gateway so that our Lambda function can be accessed easily through the web.
Navigate to the API Gateway console and select Create API. Next, choose build on the REST API option (not the private one). Give your API a name, set the Endpoint Type to Regional, and select Create API.
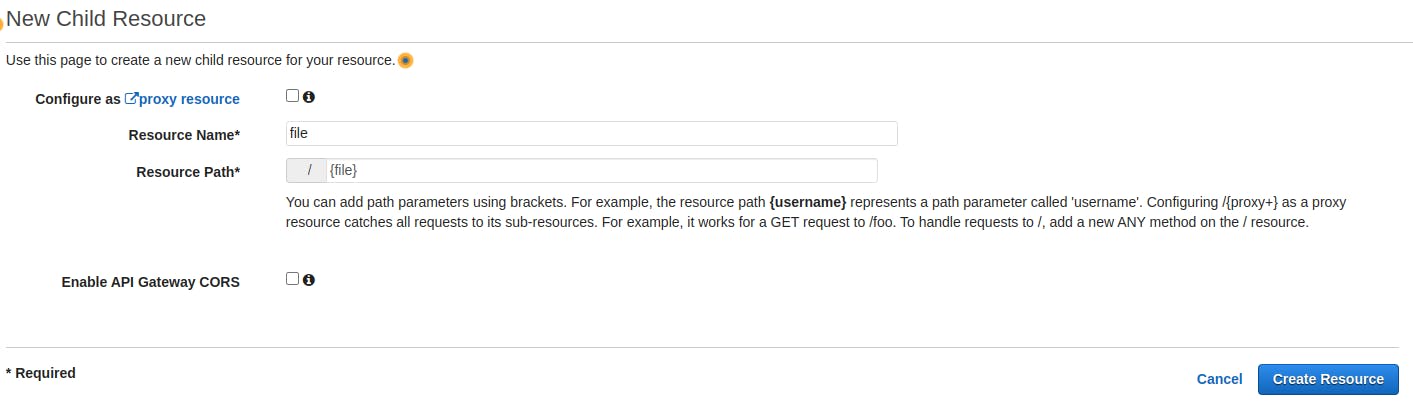
Now under Actions, select Create Resource. Give the resource a name and set the Resource Path as {file}, which will specify the URL param that contains the image name we are requesting that will be passed to our Lambda function. Finally press Create Resource.
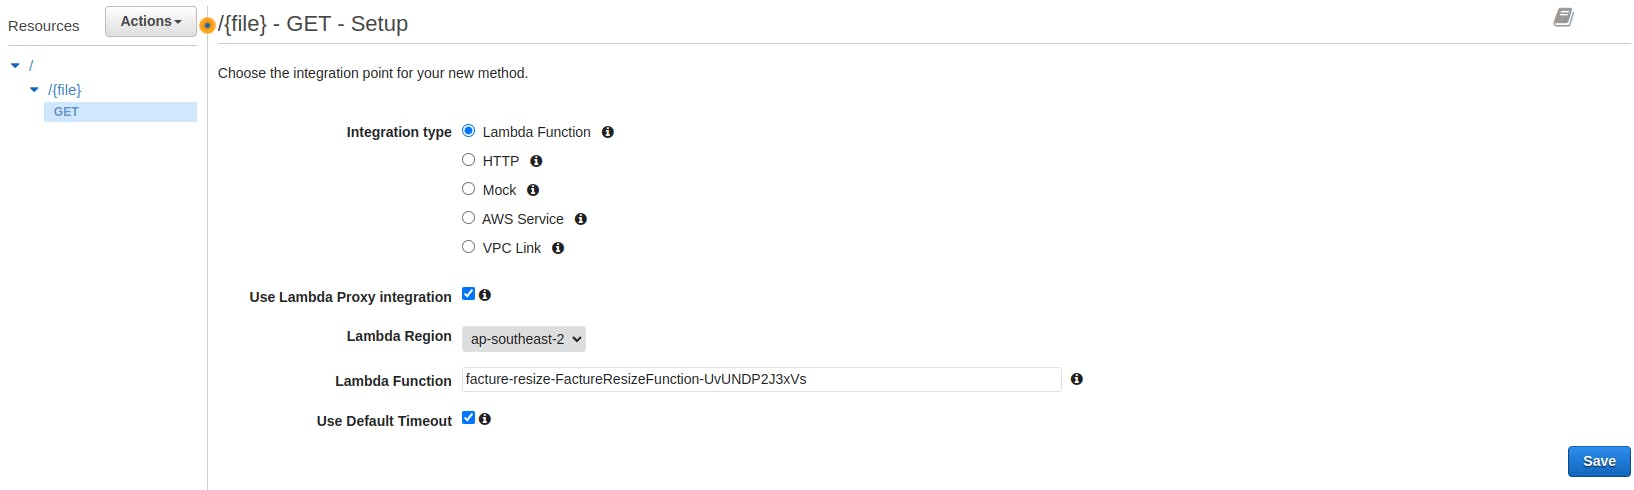
Now under Actions again, select Create method. Choose GET from the dropdown box and press the tick to confirm it. Tick the Use Lambda Proxy Integration box, and then select your Lambda function from the dropdown. Finally press Save.
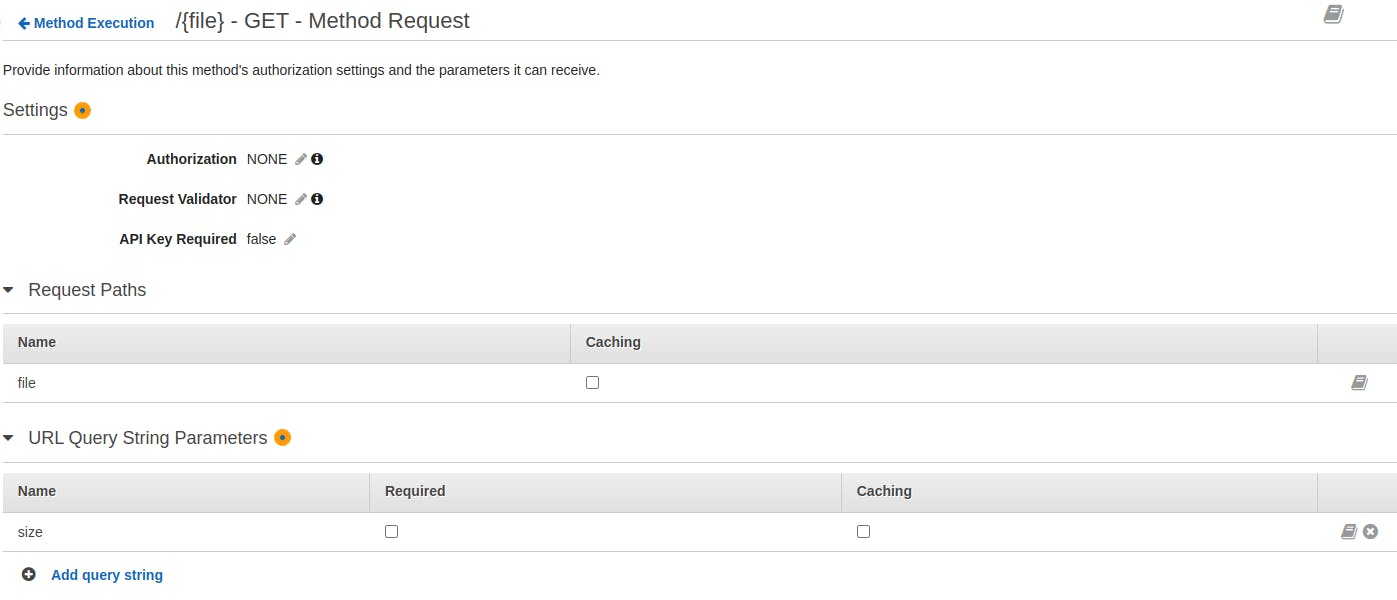
Now select navigate to Method Request, and add a URL query string param named size, which will be used for requesting the dimensions of the resized image we wish to receive, then press the tick to confirm it.
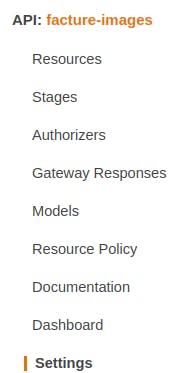
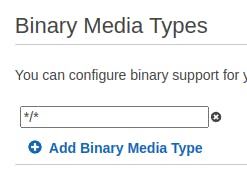
Now, navigate to Settings under your API name, and update the binary media types parameter to be */*, then press Save Changes.
Now all that is left to do is deploy your API. Navigate back to Resources, and under Actions select Deploy API. Create a new deployment stage, then press Deploy.
Congratulations, your automatic image resizing API should now be deployed! You can find the URL on the dashboard, and test it out by entering it into a search bar with the form YOUR_API_URL/YOUR_IMAGE_NAME?size=WIDTHxHEIGHT. If all goes to plan, your image should download with the requested dimensions!
Conclusion
So now you know how to automatically resize your images on the fly! If you want you can extend this even further by putting a CDN in front of your API to have your images served around the globe at blazing-fast speeds! Good luck with whatever you go ahead and build using this!